Monday, September 16, 2013

Wrapping up

As the Google summer of code (Gsoc) is drawing to an end, I've been spending the past week polishing the library in its current state rather than trying to rush through any new features through. To recap, the port Cocos3D-XNA currently has support for:


  • creation of orthographic/perspective cameras
  • animatable camera properties (position, zooming etc)
  • configurable materials (multi-texturing, ambient/specular/diffuse/emission colors)
  • integration with custom shaders
  • creation of primitive 3d meshes (spheres, cones, boxes and planes),
which overall I don't think is too shabby a foundation for the port on which to build upon.

Finally, no words can describe how grateful I am to both Google and Mono for this experience, so instead I'll leave them with this:


Monday, September 9, 2013

Primitive 3d shapes using CC3ParametricMeshes

In the past few weeks, we looked at how to load/use materials but I always glossed over how to create our drawing data when running through some examples. Well, no more! Using cocos3d's CC3ParametricMeshes we can painlessly create a collection of different 3d primitive shapes. First, we create our object as so

CC3ParametricMeshes mesh = new CC3ParametricMeshes(0, "myShape");

and then we specify the appropriate populate method for the particular shaper we're after that will load the corresponding locations, normals and tex coordinates. So, we could create a sphere by

// radius and tessellation
mesh.PopulateAsSphere(3.0f, new CC3Tessellation(50,50));

or a cone by calling

// base radius, height and tessellation
mesh.PopulateAsHollowCone(3.0f, 5.0f, new CC3Tessellation(50, 50));

and so on. Currently, within Cocos3D-XNA the CC3ParametricMeshes class additionally provides support for creating rectangles and planes.

Once we've populated our mesh, that's pretty much it with respect to our drawing data! It's just a matter of associating our mesh with a corresponding material and putting it altogether as seen below

Click to enlarge


Monday, September 2, 2013

CC3Material - part 2 (Multitexturing)

Continuing on from last week, we'll again look at the CC3Material class within Cocos3D-XNA and run through an example of how to add (multiple) textures to our materials. To begin, we load our texture files

CC3GraphicsTexture2D crateTexData = new CC3GraphicsTexture2D("Content/crate.jpg");
CC3GraphicsTexture2D logoTexData = new CC3GraphicsTexture2D("Content/logo.gif");

CC3Texture crateTexture = new LCC3Texture(0, "crate");
crateTexture.GraphicsTexture = crateTexData;

CC3Texture logoTexture = new LCC3Texture(1, "logo");
logoTexture.GraphicsTexture = logoTexData;

that are seen below


and then add these textures to our material

multiTexMaterial.AddTexture(crateTexture);
multiTexMaterial.AddTexture(logoTexture);

Finally, we need to specify how these textures are overlaid. This is done by setting the ivar TextureUnitMode in our texture objects which is of enum type CC3TextureUnitMode  that (currently) takes one of the following values

// replace src with dst
CC3TextureUnitMode.Replace,

// add src with dst
CC3TextureUnitMode.Add, 

// replace src with dst where alpha > 0.0
CC3TextureUnitMode.Decal, 

// mix src with dst using TextureUnitConstantColor
CC3TextureUnitMode.Blend 

Note, that the order of rendering of textures in a material is based on the order in which it's added. So typically the first texture added would have the  TextureUnitMode set to CC3TextureUnitMode.Replace. So for our example we would have

crateTexture.TextureUnitMode = CC3TextureUnitMode.Replace;

Then, for subsequent textures that are drawn on top of the initial texture, it's a matter of playing around with the different mixing effects. For the case of CC3TextureUnitMode.Blend a user is required to additionally set a texture object's TextureUnitConstantColor ivar which can adjust the alpha of the source texture as well as overlay it with an additional hue.

Overall, in combination with the other different material/lighting attributes talked about last week, you can get some pretty nice effects as seen below

Click to enlarge

Monday, August 26, 2013

CC3Material - part 1

As promised, this week I'll showcase the use of materials within the port Cocos3D-XNA. As a point of comparison, let's start off by creating four cubes that have no material associated with them, but instead are simply rendered with a single colour as seen below.


Click to enlarge


I've omitted the details on how to create and load the vertex data, which I'll leave for another post. For now, we're just interested in making our cubes look sexier! To do this, I created four different CC3Material objects, as so


CC3Material material = new CC3Material(0, "Glowy");
material.ShaderProgram = materialShaderProgram;
material.AmbientColor = new CCColor4F(0.0f, 0.1f, 0.1f, 1.0f);
material.DiffuseColor = new CCColor4F(0.5f, 0.5f, 1.0f, 1.0f);
material.SpecularColor = new CCColor4F(1.0f, 1.0f, 0.0f, 1.0f);
material.EmissionColor = new CCColor4F(0.5f, 0.5f, 0.0f, 1.0f);
material.Shininess = 100.0f;
material.ShouldUseLighting = true;

material = new CC3Material(1, "Grass");
material.ShaderProgram = materialShaderProgram;
material.AmbientColor = new CCColor4F(0.0f, 0.1f, 0.0f, 1.0f);
material.DiffuseColor = new CCColor4F(0.0f, 0.2f, 0.0f, 0.2f);
material.SpecularColor = new CCColor4F(0.0f, 1.0f, 0.0f, 1.0f);
material.EmissionColor = new CCColor4F(0.0f, 0.1f, 0.0f, 1.0f);
material.Shininess = 1.0f;
material.ShouldUseLighting = true;

material = new CC3Material(2, "Metal");
material.ShaderProgram = materialShaderProgram;
material.AmbientColor = new CCColor4F(0.0f, 0.3f, 0.9f, 1.0f);
material.DiffuseColor = new CCColor4F(0.0f, 0.0f, 1.0f, 1.0f);
material.SpecularColor = new CCColor4F(0.1f, 0.8f, 0.5f, 1.0f);
material.EmissionColor = new CCColor4F(0.0f, 0.2f, 1.0f, 1.0f);
material.Shininess = 100.0f;
material.ShouldUseLighting = true;  

material = new CC3Material(3, "Watery");
material.ShaderProgram = materialShaderProgram;
material.AmbientColor = new CCColor4F(0.1f, 0.9f, 0.0f, 1.0f);
material.DiffuseColor = new CCColor4F(0.9f, 0.5f, 0.9f, 0.5f);
material.SpecularColor = new CCColor4F(0.0f, 0.0f, 0.9f, 1.0f);
material.EmissionColor = new CCColor4F(0.1f, 0.15f, 0.15f, 1.0f);
material.Shininess = 1.0f;
material.ShouldUseLighting = true;

each of which have different attributes tweaked. You can check out this tutorial for a nice explanation on the effect of the different lighting/material contributions (ambient, specular, diffuse etc.). Personally, I'm no expert, so I found experimentation works best.

Finally, using an inbuilt Cocos3D-XNA shader (see last week), we can bind each of our four cubes with one of the materials, and behind the scenes Cocos3D will load these material ivars into corresponding shader uniforms.  In the end, our scene now looks like
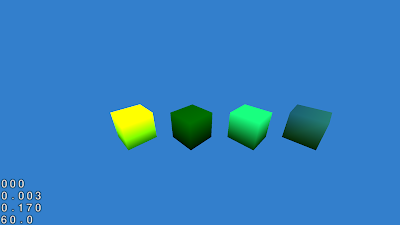
Click to enlarge


which (I think) is much nicer than our original scene! Again some details have been glossed over, but hopefully you'll agree that creating a material in Cocos3D-XNA is fairly straight forward task.

Next week, I'll talk about incorporating textures into our materials to create even slicker effects.

Sunday, August 18, 2013

Using CC3ShaderProgramMatchers

Last week, I was talking about how to load a custom shader in Cocos3D-XNA. Well, what's nice about cocos3d is that it comes pre-bundled with a set of shaders that provide support for basic colouring, multi-texturing and bump map effects. Getting access to these shaders is handled by the CC3ShaderProgramMatchers class. For example to load the corresponding single texture shader we write

CC3ShaderProgram program = new CC3ShaderProgramMatchers().SingleTextureProgram();  

Once we have the shader, we would like to configure its parameters. However, in this instance a user shouldn't have to be burdened with understanding the innards of a shader they didn't write themselves. Thankfully, cocos3d does the heavy lifting of associating all bundled shaders' attributes/uniforms to corresponding instance variables belonging to a host of different objects.  As an example, within our bundled shaders we have the (sample of ) material uniforms

uniform float4 u_cc3MaterialAmbientColor;
uniform float4 u_cc3MaterialDiffuseColor;
uniform float4 u_cc3MaterialSpecularColor;
uniform float4 u_cc3MaterialEmissionColor;   

which are bound to the ivars

material.AmbientColor;
material.DiffuseColor;
material.SpecularColor;
material.EmissionColor;   

of the currently set CC3Material object within the graphics context. Other classes of interest include: CC3Light, CC3MeshNode, CC3PointParticleEmitter (along with others), which are similarly tied to a number of different shader parameters. So now to use these pre-bundled shaders, a user simply has to worry about setting a collection of ivars and cocos3d will make sure the correct shader parameters are updated.

Next week, I'll be putting all this theory into practice with the port Cocos3D-XNA by showing the basics of creating and using a material object!


Sunday, August 11, 2013

Setting shader values

Both cocos3D and XNA support the use of shaders. In the former case, these shader programs are written in GLSL, while XNA makes use of Microsoft's HLSL. As MonoGame (which Cocos3D-XNA  relies on) is a cross-platform implementation of XNA, there is a need to be shader language-agnostic, which by and large MonoGame achieves.

With that in mind, I wanted to show how a user can interact with a shader in the port Cocos3D-XNA. Loading a shader file is done by:

CC3ShaderProgram shader = new CC3ShaderProgram(0, "MyShader", semanticDelegate, "shaderFilename");
// Params info: tag, name, knows shader var types, location of shader file     

Once we have the shader object, we can start playing around with its parameters. Below is a sample of using a shader, originally written in HLSL, to incorporate lighting effects into the scene


Such an effect was produced by setting values to around ten different shader uniforms (constants), which is achieved by:

CC3ShaderUniform shaderUniform = shader.UniformNamed("uniformName");
shaderUniform.SetValue(someValue); 
// someValue can be of type float, vector, texture etc  

You might think manually setting so many uniforms is a cumbersome task, and in general, it would be nice if a user could use a bunch of common effects like multi texturing without having to roll their own shader. Thankfully, cocos3d has you covered, and in the upcoming weeks I'll (hopefully) showcase how this done in Cocos3D-XNA.


Sunday, August 4, 2013

Introduction


Hello! My name is Rami and I'm a student programmer participating in the 2013 Google Summer of Code (GSoC) with mentor organization Mono.

My project, Cocos3D-XNA, involves porting the 3d graphics library cocos3d from Objective-C to C#. With the aid of MonoGame --- an open source and cross-platform implementation of Microsoft's XNA 4.0 graphics framework, the aim is to similarly make Cocos3D-XNA a cross-platform port.

I'm about at the half-way point of GSoC (sorry, bit late in setting up my blog), so I thought I'd showcase the progress made so far.

Camera support

Firstly, in contrast to XNA/MonoGame, cocos3d has an in-built CC3Camera suite of classes that are responsible for updating the view and projection matrices of a scene base on changes to a camera's position, target, zoom factor etc. Additionally, cocos3d also includes support for animating these camera parameters. Here's an example of the port Cocos3D-XNA putting a perspective camera through its paces.


Shader/Texture support

Porting cocos3d's logic for loading/binding shader programs and textures primarily involved translating a lot of OpenGL calls into their corresponding XNA equivalents. Here's an example of the port rendering a scene using a simple single texture shader.


You can find both the demo code and API on GitHub here. Any comments or suggestions would be great. Just keep in mind there's still a lot left to be done!